
Adjust single colors
Color Adjust changes particular colors. You pick a color, DarkRay selects it and the colors near it, and you shift them. Use it to deepen the blue of a sky, calm a green, or even out warm skin tones. A layer holds up to eight color edits.
Add a color edit
Section titled “Add a color edit”- Open Color Adjust in the right column.
- Click the pipette, then click a color in the photo, or drag across an area to average it. A chip for the new edit appears. The pipette turns itself off after one pick.
You can also click an empty spot on the wheel to add an edit around that color. With eight edits the pipette is disabled; delete one to add another.

Read the wheel
Section titled “Read the wheel”The wheel is a map of colors. The angle around the wheel is the hue, and the distance from the center is how colorful it is. The gray dashed disc in the middle is a floor: grays are never selected.
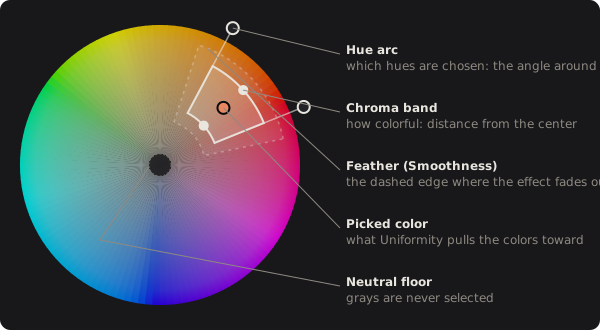
The active edit is the solid wedge, with a dashed outline where its effect fades out. To change the selection:
| Do this | To |
|---|---|
| Drag a handle on the rim | Move that edge of the hue arc |
| Drag the inner or outer dot | Move that edge of the chroma band |
| Drag inside the wedge | Move the whole selection |
| Click another wedge | Select that edit |
| Click outside every wedge | Add an edit there |
| Hold Shift while dragging | Move a quarter as far |
| Double-click a handle | Pull that edge in to the smallest width |
The Luma Range ramp beside the wheel limits the selection by brightness. Light is at the top. Drag its two keys to keep only the tones between them; the dashed lines show the fade. Smoothness sets how soft every edge is, on hue, chroma and brightness together.
Change the selected colors
Section titled “Change the selected colors”| Slider | What it does |
|---|---|
| Hue Shift | Turns the hue, up to 90 degrees either way. |
| Sat Shift | Makes the colors more (+) or less (-) colorful. -100 is gray. |
| Luma Shift | Lightens (+) or darkens (-) the colors, anchored at black. |
| Uniformity | At +100 every selected color becomes the picked color. Below 0 it spreads them apart. |

The dot at the center of the wedge is the picked color. It only matters while Uniformity is not 0, and it shows only then.
See what is selected
Section titled “See what is selected”- Range Overlay paints the active edit’s selection over the photo in green. Click its button or press O (by default) while the section is open. It steps aside when you change Hue Shift, Sat Shift, Luma Shift or Uniformity so you can see the result.
- Photo Colors dims the wheel where the photo has no colors, so the colors it does have stand out.
- Show Other Edits draws every edit’s wedge. Turn it off to see only the active one.
Manage several edits
Section titled “Manage several edits”Each edit is a chip, colored like the edit and named for it, such as “Light Orange” or “Dark Muted Blue”.
- Click a chip to select it. Alt-click turns it off and on.
- Right-click a chip for Rename, Duplicate, Turn Off or Turn On, and Delete.
- On the active edit’s line, the power button turns it off and the trash button deletes it.
Every edit selects from the photo as it arrives at Color Adjust, not from another edit’s result, so the order doesn’t matter. Where two selections overlap, their changes are averaged, not added. If you want one edit to build on another, put it on a second layer. See Layers.
The header menu lists three ready-made sets, Deeper Blues, Softer Greens and Even Warm Tones. A preset replaces the whole list of edits. See effects and presets.
Technical details: how the selection works
Selection and changes work in OkLCh, a color space where equal steps look equal. The wheel’s distance is chroma relative to the most colorful value for that hue, so every hue reaches the rim.
A tight selection on single pixels would break up into speckle under a strong push. So the selection is read from a copy smoothed with an edge-aware filter, while the change applies to the sharp pixels. Dragging and the settled picture use the same operation, so nothing changes when you let go. Hue Shift and Sat Shift leave lightness alone, so texture stays.