
Mask with gradients
A gradient mask makes an edit fade in smoothly. Use a linear gradient to darken a sky toward the top, or a radial gradient to lift a face or add a soft vignette.
Add a gradient
Section titled “Add a gradient”Click the Draw button next to Layer, then its small arrow to choose Linear Gradient or Radial Gradient. The layer starts with that mask. To add one to an existing layer, right-click the layer, choose Add Mask (or Add), then the gradient.
The gradient’s handles appear on the photo while its row is selected. They hide while you are in the crop tool.
Place a linear gradient
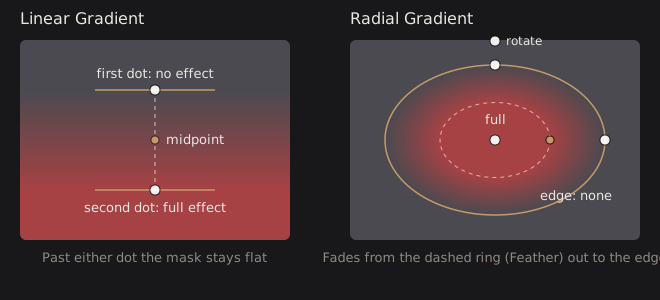
Section titled “Place a linear gradient”A linear gradient has two white dots joined by a dashed line, with an amber line across each dot.
- The first dot (where the mask is 0) gets none of the layer’s effect.
- The second dot (where the mask is 1) gets all of it. Beyond it, the effect stays full.
- Between the dots, the effect ramps up.
A new gradient is vertical: no effect at the top of the ramp and full effect toward the bottom. Drag either dot to move that end. Drag the dashed line to move the whole gradient. Drag the amber dot between them to move the midpoint, the place where the effect reaches half strength. You can also set Midpoint in the mask’s card; 50% is an even ramp.
To flip which side gets the effect, click Invert in the card.

Place a radial gradient
Section titled “Place a radial gradient”A radial gradient selects an oval. It has five handles:
| Handle | Drag it to |
|---|---|
| Center dot | Move the oval |
| Dots at the right and bottom of the oval | Change the oval’s width and height |
| Dot above the oval | Rotate it |
| Amber dot inside | Change how far in the fade starts |
The solid outline is where the effect ends. The dashed oval inside is where the fade begins: everything inside it gets the full effect. The card has the same controls as sliders: Feather (0% is a hard edge, 100% fades from the center), Midpoint and Angle.
The oval selects the inside. Click Invert to select everything outside it instead, for a vignette-like effect.
Technical details: how the ramps are computed
Handle positions are stored as fractions of the photo, so a gradient keeps its place at any resolution, and the ramp is evaluated in pixels so it stays correct on non-square photos. The handles are drawn on the cropped view, but the mask is defined across the full uncropped photo, so cropping never moves it. With a rotated crop the handle placement is approximate, so a handle can sit slightly off the ramp it controls.
A linear gradient measures how far each pixel lies along the line from the first dot to the second and clamps that to 0–1. A radial gradient measures the distance from the center in units of the oval’s radii, then fades from 1 at the dashed oval to 0 at the outline. Midpoint bends either ramp with a power curve. It leaves the ends where they are and moves the place that reaches half strength, and 50% leaves the ramp straight.
If you change the lens correction, the handles move with the photo’s geometry so the gradient stays on the same part of the scene.