
Merge a bracket to HDR
Merge a bracket when no single exposure holds both the shadows and the highlights. The result is one photo with the whole range, ready to edit.
Merge a bracket
Section titled “Merge a bracket”- Select the RAW frames of the bracket in the grid.
- Choose Image › Merge to HDR… (Ctrl+H by default).
- Check the preview and the controls below.
- Click Merge.
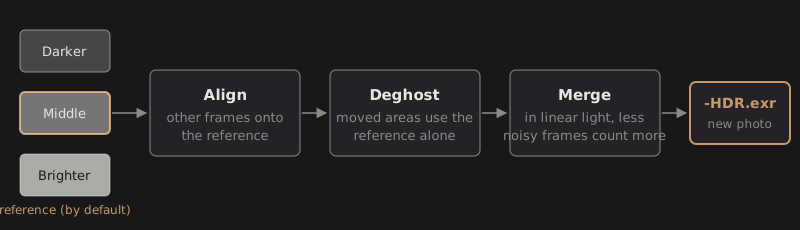
The result is <reference>-HDR.exr, stacked with the frames. See Merge photos
for where it goes and what it starts with.

Choose the reference
Section titled “Choose the reference”The Frames section lists each frame with a thumbnail, its file name and its exposure, for
example 1/40 · ƒ/8 · ISO 64. The reference is marked with a filled radio button. By default it is
the middle exposure of the set.
Click another frame to make it the reference. The merged photo keeps the reference’s geometry, and the result is scaled to look like it. Other frames are aligned onto it and are never moved themselves.
The note at the right of each row shows the exposure correction DarkRay measured, such as
+0.02 EV, and how far the frame had to move to line up, such as 0.3 px.
Align frames
Section titled “Align frames”Align frames is on by default. It shifts and warps the other frames onto the reference with sub-pixel accuracy, which handheld brackets need. A frame that moved less than half a pixel is left alone. With alignment on, the section shows the largest movement it measured.
Turn it off to merge the frames exactly as they are.
Handle moving subjects
Section titled “Handle moving subjects”Deghost decides where a moving subject, such as leaves, water or a walking person, takes its pixels from the reference frame alone instead of from every frame.
| Amount | What happens |
|---|---|
| Off | Every frame is merged everywhere, even where something moved. |
| Low | Only large, obvious movement falls back to the reference. |
| Medium | The usual choice: moving subjects and foliage take the reference alone. |
| High | Any disagreement between frames takes the reference, with more noise there. |
The starting amount is Medium; change it in Preferences › Library › Merge. Turn on Show deghost overlay to tint the pixels where the reference alone was used, then raise or lower the amount until only the moving parts are tinted.
Zoom the preview
Section titled “Zoom the preview”Use the Fit and 1:1 buttons under the preview, the mouse wheel to zoom at the cursor, and drag to pan. The preview is reduced resolution, so judge noise and fine detail on the merged photo in Edit, not here.
Technical details: how the frames are weighted
Each frame’s exposure comes from its EXIF (shutter time, ISO, aperture), then is refined from the pixels that are well exposed in both frames and kept within 0.15 EV of the EXIF value. A frame’s relative radiance is its value divided by its exposure.
The merge is a weighted average that favors the frames with less noise. The noise model, a shot-noise term plus a read-noise term, is estimated from the frames themselves rather than from a per-camera profile. Clipped pixels, pixels below the black floor, warped-in borders and moving pixels get zero weight. A pixel clipped in every frame takes the shortest exposure.
Deghosting predicts each frame from the reference and measures how far the real frame differs, in units of expected noise. The thresholds are 6 to 12 noise units for Low, 4 to 8 for Medium and 2.5 to 5 for High. The motion mask is then closed, blurred and used as a per-pixel weight.
Alignment matches SIFT features, fits a homography, then refines it with an ECC search and applies it with bicubic resampling. The reference is never resampled.