
Work with layers
A layer is a set of edits. The Base layer edits the whole photo. Add a local layer when an edit should reach only part of it, such as a darker sky or a brighter face.
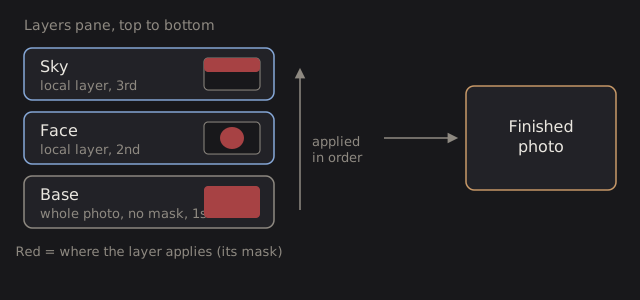
Know what a layer can change
Section titled “Know what a layer can change”Every photo has one Base layer. It is pinned at the bottom of the Layers pane, tagged GLOBAL, and you can’t hide, rename, move or delete it. It has no mask.
A local layer has its own edits, an optional mask that says where they apply, and an opacity. Layers apply from the bottom up, so a layer works on the result of the layers under it. There are no blend modes.
Not every edit can be local. The sections with blue titles belong to a layer. The others change the whole photo and live on the Base only.
| Per layer (blue titles) | Whole photo (Base only) |
|---|---|
| General, Curves, Color Adjust, Color Grading, Sharpen, Halation, Exponential Glow, Atmosphere | RAW Process (with the lens corrections), Profile (with Monochrome), Color Primaries, Framing, Vignette, Look |
The Editing band above the sections names the layer you are adjusting. For the Base it reads “Global”. For a local layer it shows the mask count and, below 100%, the opacity.
Add a layer
Section titled “Add a layer”- Select the layer the new one should sit above. Select the Base to put it first.
- Click Layer at the top of the Layers pane for an empty layer, or use a mask button beside it to start the layer with a mask.
- Adjust the sections on the right. The edits reach only what the layer’s mask selects, or the whole photo if it has no mask.
A new layer is called Layer, then Layer 1, Layer 2 and so on. An empty layer changes nothing until you adjust something in it.
Rename, hide, fade and delete
Section titled “Rename, hide, fade and delete”| To | Do this |
|---|---|
| Rename | Double-click the name or press F2 |
| Hide or show | Click the eye on the layer’s row |
| Fade | Click the opacity number at the right of the row, then use the slider, type a value, or pick 25, 50, 75 or 100% |
| Duplicate | Click the duplicate button at the right of the bar, or right-click and choose Duplicate Layer |
| Delete | Right-click (or hover and click the ⋯ button) and choose Delete Layer, or press Delete |
Duplicating copies the layer’s edits and masks. Deleting asks for no confirmation, so use Image › Undo (Ctrl+Z by default) to bring a layer back.
Opacity scales how strongly the layer shows through its mask. The number turns amber below 100.
Change the order
Section titled “Change the order”Drag a layer’s row up or down. A line shows where it will land, and its masks move with it. Order matters: a layer higher in the list sees the work of the ones below it. The Base always stays at the bottom.
Set white balance on a local layer
Section titled “Set white balance on a local layer”On the Base, Temperature is the white you want in kelvin. On a local layer it starts at the Base white and shifts away from it. The slider still reads in kelvin, but what the layer stores is a shift, so if you later change the Base white, every local layer moves with it. Tint is relative on every layer.
Tone mapping on a local layer
Section titled “Tone mapping on a local layer”The tone-mapping sliders in General, such as Contrast, Highlight Rolloff and Black Level, are offsets on a local layer. At 0 the layer leaves the Base’s tone mapping alone. Moving one nudges the tone mapping only where the layer’s mask selects. For the controls themselves see Editing and Effects.
Technical details: how layers combine
Layers composite in linear light, one after another. The Base renders first. Then, for each local layer in order:
result = lerp(result, layer_edit(result), mask × opacity)In plain words: DarkRay applies the layer’s edit to everything the earlier layers produced, then blends that edited copy back in. Where the mask is 1 and opacity is 100%, you see the edited version. Where the mask is 0, you see the earlier result. In between, you get a mix. A layer without a mask uses a mask of 1 everywhere.
Because each layer reads the result of the ones below it, a luminance mask picks tones from that result, not from the original file.
The tone mapping is the one step that is not blended per layer. Each layer’s tone-mapping offsets are added up, weighted by its mask and opacity, and the combined setting is applied once at the end. A hidden layer adds nothing. A layer with no edits is skipped.
Nothing here changes your file. The photo is re-rendered from the original each time, so layers stay fully editable.