
Find your way around Edit
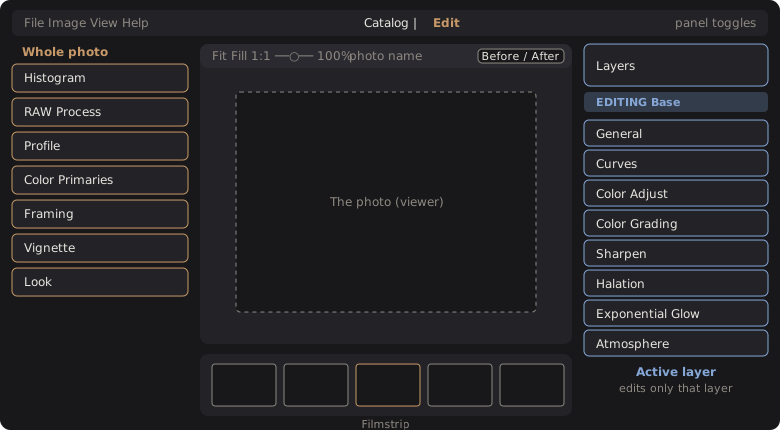
Edit is where you change a photo. The viewer is in the middle, the sections that affect the whole photo are on the left, and the layers and their sections are on the right.
Open a photo in Edit
Section titled “Open a photo in Edit”Select a photo and press E (by default), click the Edit tab at the top, or choose Image › Open in Edit. The left and right arrow keys step to the previous and next photo.
Know the two columns
Section titled “Know the two columns”The left column starts with the Histogram. Under it are the sections that apply to the whole photo, top to bottom in the order DarkRay applies them: RAW Process, Profile, Color Primaries, Framing, Vignette and Look.
The right column starts with the Layers pane. Under it, a band reads EDITING and the name of the active layer. The sections below the band (General, Curves, Color Adjust, Color Grading, Sharpen, Halation, Exponential Glow and Atmosphere) change only that layer. With one layer, the Base, they change the whole photo. See Layers to limit an edit to part of a photo.
Click a section’s title to open or close it. F5 hides the left panel, F7 the right panel and F6 the filmstrip.
See the order edits are applied
Section titled “See the order edits are applied”DarkRay applies edits in a fixed order, whatever order you move the sliders. The order is not the order of the right column’s sections. For example, Color Grading is applied before Color Adjust even though it sits below it, and Highlights, which is in General, is applied after both. The Look is always near the end.
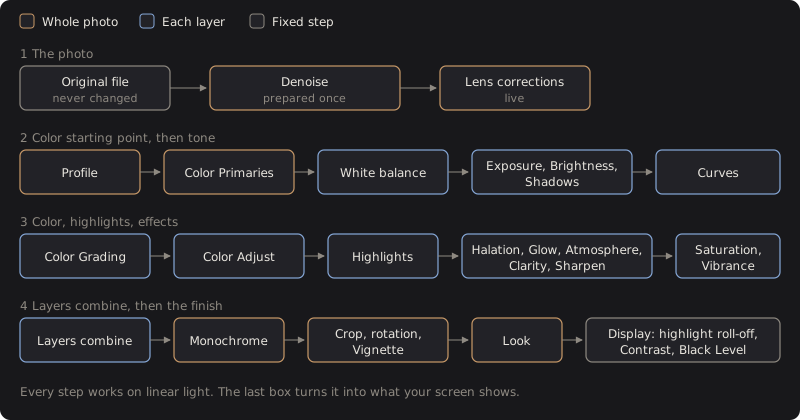
The photo is always re-rendered from the original, so you can change any step at any time.
Zoom and move around
Section titled “Zoom and move around”The strip above the photo has Fit, Fill and 1:1 buttons, a zoom slider and a field where you can type a percent, from 2% to 1600%. Double-click the slider to go back to Fit.
| To | Do this |
|---|---|
| Fit the whole photo | F |
| Switch between Fit and 100% at the pointer | Z |
| See one screen pixel per photo pixel | Alt+1 (Alt+2 to Alt+4 for 200% to 400%) |
| Zoom in or out | + and -, or hold Ctrl and use the mouse wheel |
| Move the photo | Hold Alt and drag, or drag with the middle mouse button |
Compare with the original
Section titled “Compare with the original”Click Before / After at the right of the strip, or press \ (backslash). The viewer shows the photo without your edits. Your crop and rotation stay, so the two frames line up. Click again to come back.
Read the histogram
Section titled “Read the histogram”The Histogram shows the red, green and blue values of the photo as you see it on screen, with the overall brightness in gray behind them. The scale runs from 0 (black) on the left to 255 (white) on the right.
A red bar at either edge warns that more than half a percent of the pixels in a channel sit at pure black or pure white. The line under the histogram shows the photo’s ISO, aperture, shutter speed and focal length.
Technical details: how Edit renders, and what the histogram and Before / After show
Every edit works on linear light in a wide color space (ProPhoto RGB), and the picture is mapped to your screen only at the end by a display transform (AgX). That transform rolls bright areas off to white instead of clipping them, which is why values above white survive your edits. Edits are never written to the original. Each render starts again from the original file and runs the steps in the order above.
The histogram counts the same 8-bit display values the viewer paints, the way Lightroom does, so it reads the finished picture rather than the linear-light data underneath. Each render supplies its bins, so it follows your edits as you work.
Before / After renders the unedited photo with no profile, layers or look. It keeps your crop, Framing and rotation, so only the edits differ.