
Merge a panorama
Stitch overlapping frames into one wide photo. DarkRay works out where each frame was pointing, blends them in linear light and gives you controls to level the horizon, choose the projection and fill the edges.
Merge a panorama
Section titled “Merge a panorama”- Select the RAW frames in the grid. Neighboring frames need to overlap by about a third.
- Choose Image › Merge to Panorama… (Ctrl+M by default).
- Check which frames connected, then set the projection, level and canvas below.
- Click Merge.
The result is <first frame>-Pano.exr, stacked with the frames it used. See
Merge photos for where it goes and what it starts with.

Check the frames
Section titled “Check the frames”Each row in Frames has a dot: green when the frame connected to the others, red when it did not. A connected frame shows its number of matches, such as “212 matches”. A frame with no reliable matches shows “left out” and is not stitched. Below the list, “All 3 frames connected” or “2 of 3 frames connected; not stitched: …” says the same in words.
If too few frames overlap, the preview shows the reason and Merge stays off, for example “Fewer than two of these photos overlap enough to stitch. Neighboring photos need to overlap by about a third.”
Pick a projection
Section titled “Pick a projection”Projection sets how the sweep is flattened onto a picture. It starts on Spherical; change the default in Preferences › Library › Merge.
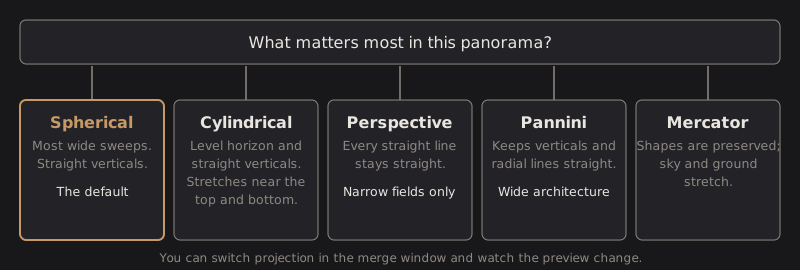
Level the horizon
Section titled “Level the horizon”Level turns the whole panorama. Pitch, Roll and Yaw each run from −45° to 45° in 0.1° steps; double-click a slider to put it back to 0°.
To level by eye on the scene, use the horizon tool:
- Click Horizon tool: click two points.
- Click one point on the horizon. The preview says “Click a point on the horizon · Esc cancels”.
- Click a second point on the horizon.
The preview shows “Leveling…” and then the straightened result; the three angle sliders show the values it found. Fine-tune them if you like. Esc cancels the tool, and a second Esc closes the window. Merge waits until the leveling has finished.
Set the canvas
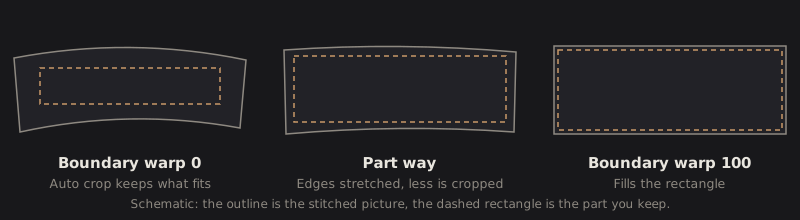
Section titled “Set the canvas”- Auto crop is on by default. It trims the result to the largest rectangle that is covered by frames. A dashed outline on the preview shows the crop, and the line under it says what you will get, for example “Output ≈ 17,113 × 5,564 · 95.2 MP”.
- Boundary warp runs from 0 to 100 and starts at 0. It stretches the edges toward the full frame instead of cropping them away. The preview updates when you release the slider. Use as little as you need; the more you use, the more the scene is stretched.

Blend the frames
Section titled “Blend the frames”- Exposure compensation is on by default. It evens out the brightness of the frames from their overlaps before blending.
- Seams chooses where one frame hands over to the next. Graph cut (the default) follows the least visible path through each overlap and is slower. Fast cuts halfway through each overlap, which is quick for trying things out.
Use Normalize for the lens profile and white balance, as for any merge.
Technical details: how the stitch is solved
DarkRay finds SIFT features on a reduced copy of each frame, matches them, and keeps the largest connected set of frames. A rotation-only camera model is fitted by bundle adjustment, with each frame’s focal length seeded from its EXIF focal length and the principal point at the frame’s center. A wave correction gives the starting level, and your pitch, roll and yaw rotate the whole panosphere on top of it.
Exposure compensation is a single linear gain per frame, fitted from the overlaps. Seams come from a graph cut on color and gradient, or from Voronoi cells for Fast. Blending is a Laplacian pyramid in linear float, with between 2 and 7 bands depending on the frame size.
Boundary warp is a mesh warp: the outline of the covered area is mapped onto the sides of its bounding rectangle, and the interior is solved so the stretch is spread as evenly as possible. The amount blends between no warp and the full warp. Auto crop then trims whatever the warp left empty.
The output is scaled by the gain LibRaw’s auto brightness would give the stitched canvas, so the panorama opens at about the brightness a single frame of it would have.